| | SCI HOME PAGE | CATALOG | HOW TO ORDER | GREAT SPACE LINKS | FAQ | |
Galileo SCIENCE KIT Presentation Guide
DISPLAY IDEAS FOR SCIENCE FAIRS, CLASSROOM USE, CLUB ACTIVITIES, PLANETARIUMS, ETC.
![]()
| | SCI HOME PAGE | CATALOG | HOW TO ORDER | GREAT SPACE LINKS | FAQ | |
![]()
Photocopy all the tasks on this sheet and cut them into individual Task-Cards. Assign two or more participants to each of the tasks, based on their preferences and abilities. Give each participant a copy of the appropriate card(s), and a copy of the Support Component diagram. Each group should also be armed with a dictionary. Have the participants thoroughly read and discuss their Task Cards before beginning work. The coordinator should assist participants by providing workspace and time, helping obtain materials, and suggesting sources of information.
The Support tasks are accomplished first. They provide components which will be used in the Demonstration Tasks to illustrate various modes of scientific space flight operations. Each group should sketch and discuss its Demonstration Task before starting work on it. Multiple displays may be set up at the same time by arranging to provide multiple support components. Alternatively, one set of support components may be rearranged repeatedly, say daily or weekly, to accomplish the demonstrations one at a time. Situations in these displays depict Galileo operations. Some of them show operations which are typical of different past and future space missions.
These tasks touch the tips of a lot of icebergs, so to speak, and provide many opportunities for curious, motivated individuals to do further research. Use public and university libraries, and NASA Educational Outreach offices, for more information.
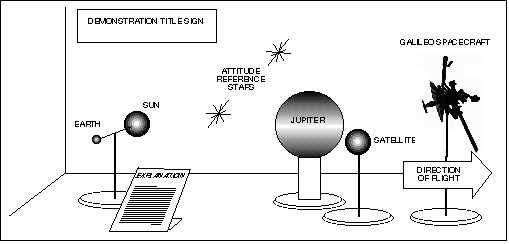
Tasks #1, 2, 3 and 4 should be finished. Make a sign for your display showing the above title. Attach a brightly colored string to a star on the display sidewall. Run it to the star tracker on the spacecraft (see spacecraft description provided with kit) and attach. This represents the view of stars which the star tracker senses. Place another star on the display sidewall to indicate the next star the tracker will view as the spacecraft spins. Direction of spin is shown on the Spacecraft Description sheet. Attach another string to Earth and run it to the Low Gain Antenna. This represents the radio signal aimed at Earth. Arrange the spacecraft so that both strings are straight. Clear away all unused components. Write up a sign explaining the display, using information from this card and/or from outside references. Make mention of the fact that the spacecraft is slowly spinning for stabilization.
Tasks #1, 2, 3 and 4 should be finished. Make a sign for your display showing the above title. For distance reference (not scale), have the spacecraft closer to the satellite than the satellite is to the planet. Refer to the Spacecraft Description provided with the kit to identify all of the optical instruments on the pointable scan platform. Arrange the components so the ISS Camera is pointing to the satellite, and the Low Gain Antenna #1 (atop the High-Gain antenna dish) is pointing to the Earth. Attach the model's Scan Platform to its stand with wire or tape, so it can anchor a string. Attach a brightly colored string to the the surface of Jupiter's satellite, and run it straight to the Solid State Imaging Camera on the spacecraft. Take a paper ribbon and write a string of ones and zeroes along its entire length to represent the binary link of computer communications. Run the ribbon from the spacecraft's Low-Gain antenna #1 straight to the Earth. Clear away all unused components. Write up a sign explaining the display, using information from this card and/or from outside references. Optionally, make an enlargement to pin up of the Jovian Orbital Tour (Figure 4) from the Spacecraft Description Sheet.
Tasks #1, 2, 3 and 4 should be finished. Remove the atmospheric probe from the Galileo model and put away. Make a sign for your display showing the above title. Cut out the illustration of GalileoŐs atmospheric probe entry (or fashion a better one).
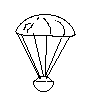 Using glue or a pin, attach it to the planet Jupiter near the mid-southern latitudes. Arrange the components so the RRH Antenna on the Galileo Orbiter is pointing directly to the descending probe, and Galileo's Low Gain Antenna #1 (atop the High-Gain antenna dish) is pointing to Earth. Note that the scale of the parachuting probe is by far too large in this arrangement. It could never be seen from orbital altitude. This is intentional, to illustrate the concept, and should be mentioned in your explanation. Take a paper ribbon about a foot in length and write a string of ones and zeroes along it to represent the binary link of computer communications. Run this from the parachuting probe to the RRH antenna dish to illustrate its data link to the orbiter. Make another paper ribbon with a string of ones and zeroes to stretch from the spacecraft's Low Gain Antenna #1 (atop the High-Gain antenna dish) to the Earth to represent telemetry to Earth. Clear away all unused components. Write up a sign explaining the display, using information from this card and/or from outside references. Optionally, make an enlargement to pin up of the Probe Entry Profile (Figure 3) from the Spacecraft Description Sheet.
Tasks #1, 2, 3 and 4 should be finished. Make a sign for your display showing the above title. Attach a brightly colored string to the spacecraftŐs Low Gain Antenna #1 (atop the High-Gain antenna dish). Run the string so it touches and bends slightly around the planet, and attach it to the Earth. Arrange the centers of Earth, the ringed planet, and the spacecraft in a straight line, and aim the Low Gain Antenna #1 right at the edge of the planet where the string touches. Keeping them in line, adjust the components so that the string is fairly taut, and shows a noticeable bend around the planet. Clear away all unused components. Write up a sign explaining the display, using information from this card and/or from outside references.
Permission is granted to reproduce this Presentation Guide for use with an associated SCIENCE KIT.
SCI Space Craft International, P.O. Box 61027, Pasadena, CA 91116-7027 USA
![]()
| | SCI HOME PAGE | CATALOG | HOW TO ORDER | GREAT SPACE LINKS | FAQ | |