|
ASSEMBLE THE UPPER TELESCOPE TUBE
View the whole assembled model
If you'd prefer to use a 3D-Printed UPPER TELESCOPE TUBE component instead of assembling and using the paper one provided in your kit, click here.
- From each of the Sheets DE, release a UPPER TELESCOPE TUBE 1/2. Using a straightedge, fold all the hinged panels on these two pieces back, in the same direction, being extremely careful not to tear the paper. Note that it is all too easy to catch and rip paper parts inadvertantly when moving the straightedge around, and it requires great care not to cause damage.
Make both pieces exactly the same. There are 22 folds on each piece.
Place down on a flat surface and press a flat, straight crease into all the folds. If you should make a tear, repair it with glue and let it dry thoroughly before proceeding.

- Set both pieces down as shown above. Overlap the three points indicated, by 1.5 mm or 1/16 inch, and glue. Make sure the pieces are straight in line with each other.
- Bring the ends of the combined UPPER TELESCOPE TUBE around to meet, forming a ring with folds pointing inward. Overlap and glue to join the ends at three points as in the last step. The piece naturally forms a loose hexagon.
+
+
+
+
+
- Examine the ELEVATION RING. Make sure all the corner slots on top of the piece are open.
Position the UPPER TELESCOPE TUBE above the ELEVATION RING such that the dark grey simulated cabling on the UPPER TELESCOPE TUBE will be on the side of each ELEVATION BEARING.
- Gently insert all 6 white tips at the bottom of the UPPER TELESCOPE TUBE into the corner slots in the ELEVATION RING. After all 6 tips are in place, grasp near the bottom of each of the 6 legs with long nose pliers, and work each leg down a little deeper into the ELEVATION RING. Repeat this process until the folded sections of the UPPER TELESCOPE TUBE begin to touch the corner slots.
- Adjust the depth each leg is inserted in order to take out any buckling that may have occurred in the UPPER TELESCOPE TUBE. Try to adjust it to be as straight and even as possible. Apply a drop of glue at each corner slot and let dry.
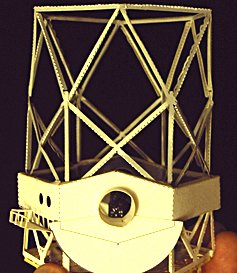
THIS COMPLETES THE UPPER TELESCOPE TUBE.
View the whole assembled model
| GO ON TO THE NEXT STEP |
| INSTRUCTIONS FIRST PAGE |
| SCI HOME PAGE |
|