Mars Global Surveyor Presentation Guide

 This Presentation Guide describes four additional configurations for your MGS spacecraft model. The Assembly Instructions guide you through building your MGS model in its Mars Mapping configuration depicted on the right, as well as in the catalog, and on the front of Parts Sheet A (Mapping Configuration is the fifth configuration described for your model).
Mapping configuration is perhaps the most popular configuration for the MGS model, because this the configuration in which all of the spacecraft's appendages are fully deployed. In places, the Assembly Instructions make mention of the four additional configurations.
You'll need to choose one configuration in which to assemble your model.
Mapping Configuration
For displaying in mapping configuration, assemble per the Instructions. Point the nadir panel toward a Mars globe, or other sphere representing Mars, point the HGA toward a sphere representing Earth, and angle the blue sides of the solar panels toward a lamp or other object representing the Sun.
Launch Configuration
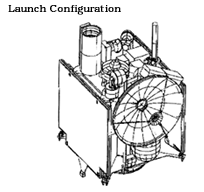 The solar panels are folded up against the spacecraft bus, with the aerobraking flap sandwiched in between them. The HGA is also stowed against the bus.
This configuration permitted the spacecraft to fit within the fairing atop its Delta II launch vehicle.
The following model parts are not used for Launch Configuration: Solar Array Supports, Solar Array Yoke, HGA Strut.
A. The Spacecraft
First assemble your model according to the instructions, but skipping all of sections 6, 8, and 9.
B. The Solar Array
Next, release the SOLAR PANEL ARRAY AND AEROBRAKING FLAP from one Sheet C/D. Notice the grey members which hold the gold aerobraking panel. They each have a hinged flap. With scissors, trim off both of the thin outer hinged flaps leading out to the gold panel.
Trim off the three little appendages, two black, one white, at the end of the solar panels opposite the gold flap.
Fold the gold panel back, creasing the grey support members where they meet the blue panel. Fold back toward the white side of the solar panel.
Crease the hinges between the two solar panels, and fold the solar panels together, white side to white side, sandwiching the gold flap inside. Apply glue to hold the panels together.
Glue the folded solar panels to the side of the spacecraft as shown in the picture above. The panel which supports the magnetometer faces outward. The magnetometer faces down toward the main engine, and the "top" of the folded panels attach to the edge of the nadir panel, protruding just slightly above it. You'll find the "bottom" of the panels rest on the PMS "arms" in this configuration. Adjust the folded panels to be vertical, that is, parallel to the PMS Cylinder.
Repeat with the other SOLAR PANEL ARRAY AND AEROBRAKING FLAP from the other Sheet C/D. Keep the panels even with one another.
C. The HGA
Glue the HGA to the +X side of the spacecraft as shown in the illustration. The apex of the gold HGA cone glues directly to the gold on the SPACECRAFT BUS, oriented so that the TWTA BOX fits above the NADIR PANEL, its corner gluing to the top of the NADIR PANEL, at the corner near the HSA and MR. The HGA strut and gimbals are not represented with your model in this configuration.
Cruise Configuration
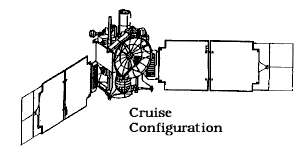 After launch, the spacecraft deployed its solar panels to face the Sun and begin converting sunlight into electrical power to operate the spacecraft. The High-Gain Antenna dish (HGA) is still stowed; the whole spacecraft is rotated to keep stable, with the HGA pointing to Earth for communications.
The HGA is stowed against the bus just as it is for Launch Configuration. The solar panels are deployed, and angled about 40 degrees toward the +X side of the spacecraft, the side the HGA is attached. The spacecraft rotates at 1/100 RPM, counter clockwise as viewed from Earth,keeping the HGA pointed toward Earth. This configuration permits the spacecraft to communicate with Earth using the HGA, and the solar array, generally facing the Sun, can generate plenty of power to run the spacecraft. The only model part not used for this Configuration is the HGA Strut.
A. The Spacecraft and HGA
Assemble model per instructions, skipping section 8. Attach the HGA per section C on the front of this page.
B. The Solar Array
Insert the small end of each SOLAR ARRAY YOKE into the SOLAR ARRAY DRIVE MOTORs. Arrange the SOLAR ARRAYs as shown in the illustration, blue sides angled about 40 degrees toward the +X side of the spacecraft (see fact sheet). Prop the model in a stable position and let the glue dry.
Once the glue has dried, apply a good amount more glue inside each SOLAR ARRAY DRIVE MOTOR to provide a strong attachment. Let dry thoroughly.
Maneuver Configuration
 The HGA is stowed against the bus just as it is for Launch Configuration. The solar panels are deployed, white sides angled about 40 degrees toward the -Z side of the spacecraft, which is toward the main engine. The spacecraft does not spin.
This configuration keeps the spacecraft stable while the main engine fires, accelerating the spacecraft toward the +Z direction. The only model part not used for this Configuration is the HGA Strut.
A. The Spacecraft and HGA
Assemble model per instructions, skipping section 8. Attach the HGA per section C on the front of this page.
B. The Solar Array
Lay the spacecraft on its side, insert the small end of each SOLAR ARRAY YOKE into the SOLAR ARRAY DRIVE MOTORs. Arrange the SOLAR ARRAYs as shown in the illustration, white sides angled about 40 degrees toward the -Z side of the spacecraft (see fact sheet), which is toward the main engine. Let the glue dry.
Once the glue has dried, apply a good amount more glue inside each SOLAR ARRAY DRIVE MOTOR to provide a strong attachment. Let dry thoroughly.
Aerobraking Configuration
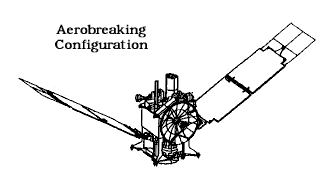 The HGA is stowed against the bus just as it is for Launch Configuration. The solar panels are deployed, and angled blue side about 40 degrees toward the +Z side of the spacecraft, which is toward the nadir panel. The spacecraft does not spin. This configuration keeps the spacecraft stable while experiencing aerodynamic force from Mars's upper atmosphere. The only model part not used for this Configuration is the HGA Strut.
A. The Spacecraft and HGA
Assemble model per instructions, skipping section 8. Attach the HGA per section C on the front of this page.
B. The Solar Array
Insert the small end of each SOLAR ARRAY YOKE into the SOLAR ARRAY DRIVE MOTORs. Arrange the SOLAR ARRAYs as shown in the illustration, white sides angled about 40 degrees toward the +Z side of the spacecraft (see fact sheet), toward the nadir panel. Prop the model in a stable position and let the glue dry.
Once the glue has dried, apply a good amount more glue inside each SOLAR ARRAY DRIVE MOTOR to provide a strong attachment. Let dry thoroughly.
Spacecraft line drawings courtesy NASA/JPL