Assemble the
Communications
Antennas
|

|
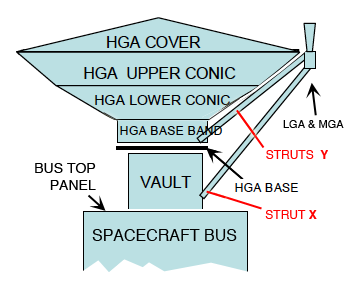
- Print Parts Sheet C on regular copy paper. Notice the blue arrows indicating that the HGA Upper Conic will set atop the HGA Lower Conic, and these will go atop the rolled HGA Base Band and atop the HGA Base. The HGA Cover will top off the stack.
Note: an optional "finishing touch" suggestion is to apply aluminum foil to the HGA Cover, for visual effect. You could clad the entire HGA assembly in foil, for that matter, although it would be a difficult task. If you choose to add foil, be sure to copy the "X" marks onto the foil with black ink.
- Lay the printed Parts Sheet C on a cutting surface, and use an art knife to cut out the HGA Upper Conic and the HGA Lower Conic. Score the tabs for folding.
- Glue each HGA Conic into a cone.
- Glue the HGA Base Band into a ring, and fold the tabs inward.
- Cut out the circular HGA Base.
- Glue these parts together according to this guide (but don't set them onto the Vault until the glue is good and dry):

- Once the glue is thoroughly dry, glue the HGA Base to the top of the Vault.
- Once the Vault glue is dry, cut out the MGA-LGA Assembly from Parts Sheet B.
- Glue the tab near the "X" marked on the struts to the base of the Vault. Glue struts "Y" up higher by the HGA Band, so that the MGA & LGA are positioned as shown.
