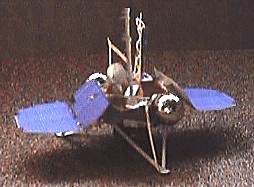
Mars Polar Lander SCIENCE KIT
Assembly Instructions
Version 1.5 For the SCI Web Site

A. YOU'LL NEED THE FOLLOWING:
- Small scissors, such as manicure scissors, to clip parts from the parts sheet.
- Wooden toothpick for applying glue.
- Glue. Use regular white glue (Elmer's Glue-All or equivalent). Or, you might want to use a hot-glue gun for quicker assembly. These can be messy, though, if you aren't very careful.
- Space. Set up a well lighted, comfortable work area, with room to set glued parts to dry.
- Time. Plan to set aside a couple of hours for unhurried assembly.
- Patience. While some parts of this kit might assemble easily due to its advanced design, there may be some trying times. Extra time and care will pay off with a surprisingly accurate, and handsome representation of NASA's Mars Polar Lander spacecraft.
- Spherical propellant tanks, 1/2 inch in diameter. Crumple some foil to make these. Ideally, they should be gold, so you might want to cover the spheres in gold foil from a candy wrapper. Tiny Christmas-tree decorations can also be found -- that's what we used in the model in the photo.
B. BEFORE BEGINNING ASSEMBLY:
- Have a look at some illustrations of the actual spacecraft from the Mars Polar Lander website.
- Examine the parts sheet and read the names of all the parts.
- Read all the instructions. Compare model parts with photos.

- Notice the RELEASE POINTS to be snipped to remove parts. Identify HINGES which join HINGE POINTS DIAGRAM segments of some parts for folding.
- Get your bearings: Refer to this picture. "Up." "above," "down," etc. refer to the directions based on the way the spacecraft model is oriented here, with "up" meaning toward the top of the page.

C. TO ASSEMBLE YOUR MODEL:
- Use manicure scissors to Release the DECK and BASE.
- Bend down panels A,B,C, and D of the part marked DECK, and insert their pointed tabs into slots A,B,C, and D on the BASE. Apply white glue with a toothpick; let dry.
- Bend each of the three triangular leg sections down, making a crease where the legs leave the BASE.
- Bend the three grey struts up, making crease where they leave the round FOOT PADs. Insert tips up into the holes marked X sticking out from the DECK, and glue.
- Release one of the 3 identical Descent Thruster assemblies along one edge of the sheet. Crease it in middle, keeping the black markings outside. With its black nozzles facing down, install its slots onto a pair of tabs marked R. Glue against the side of the DECK. Nozzles extend below the BASE. Repeat with other 2 Descent Thruster assemblies.
- Release one of the 2 blue SOLAR ARRAYs. Crease where its 2 panels join, folding blue towards blue. Fold black support arm 90 degrees away from blue. Slip slot S over tab S on DECK. Apply glue to tab. Orient the SOLAR ARRAY as shown in the photo, and apply glue where the black support arm touches a strut or part of the DECK. It may be necessary to add a small strip of card stock to make the SOLAR PANEL stable. When dry, repeat with other SOLAR ARRAY.
- Make or find two 1/2-inch spheres as mentioned above. Glue them onto the circular openings on the sides of the DECK for propellant tanks.
- Release the trusswork piece. This represents the Surface Stereo Imager atop its boom. Fold the trusswork 120 degrees along its length. Trim the truss's bottom, and glue it, standing straight up, onto the blue triangle.
- Release the Direct-to-Earth Antenna. This is the piece with a pie shape. Glue the triangular opening shut, to make a cone. Fold the rectangle in half, trim its bottom, and glue it standing straight up on the DECK just to the upper right of the "M". Note, the instructions on the printed sheet say to glue it to a blue circle, but the blue circle was accidentally covered over by gold foil.
- Release the L-shaped Robotic Arm. Fold the small rectangle 90 degrees at its middle, and glue it to the blue square on the DECK. The arm reaches out and down to ground level.
- ThereÕs one piece left. ItÕs the Meteorological (MET) mast. Release it and fold it along its length, by creasing along a ruler. The small rectangle is its base. Glue it standing straight up on the M.
Congratulations!
You've completed your Mars Polar Lander Space Craft SCIENCE KIT. Now be sure to read all about the spacecraft and its mission at the Mars Polar Lander web site.
SCI Space Craft International
P.O. Box 61027 Catalina Station
Pasadena, California 91116-7027 U.S.A.
Space Craft (tm) SCIENCE KITS are made in the U.S.A. using recycled materials and advanced processes. Copyright (c) 1997 SCI Space Craft International
| TOP OF THIS PAGE |
| SCI HOME PAGE |
![]()
![]()

