
Assembly Instructions for your Cosmos-1
|
| The materials and steps on this page result in a scale model whose solar sail blades cannot actually articulate; they will be glued in place. If you are skilled in soldering technique, and you would like to go the "extra mile," you can produce an Advanced Version whose solar sail blades can be articulated to simulate the actual Cosmos-1 spacecraft's operation. Additional materials, skills, and time are required for the Advanced Version. To build the Advanced Version, follow this link. |
What you'll need for the regular version:
- Eight sheets of 8.5 X 11-inch card stock. Use the heaviest card stock paper that your printer can handle. Use white card stock, unless you can obtain some card stock with one side metallic silver that can work in your printer: this will give excellent results, and will avoid having to use the spray paint listed below. This kind of metallic-sided card stock is available from paper specialty stores and business-supply stores.
- Some corrugated cardboard, such as a piece of a carton. Less than a square inch will be needed for one part. Optionally, a circular piece of hardwood the size and thickness of a U.S. penny, instead of the cardboard, would provide a stronger structure for your model. Eight larger pieces of corrugated cardboard (about 6 inches wide) will be needed to support your model parts while the glue dries.
- A few straight bamboo skewers, roughly 1/16-inch in diameter. If these are not available, use small diameter (about 1/16-inch) balsa- or beechwood sticks available from a hobby store.
- Small diagonal cutters (wire cutters) for cutting the bamboo skewers.
- Scissors for cutting the card stock. If a paper trimmer is available, it will be convenient to use. Use with extreme caution to prevent injury.
- Art knife, X-Acto® or equivalent, with a sharp, new blade.
- A metal straight-edge or ruler.
- One U.S. one-cent coin (penny), for tracing a circle.
- White glue, Elmer's Glue-All® or equivalent.
- Hot glue, with its hot-glue gun. These are available at most hobby stores and craft stores. Alternatively, a quick-setting two-part epoxy glue might give good results, especially if it is first cooled in the refrigerator so it won't be too runny.
- A can of metallic aluminum or silver spray paint. (This is not needed if you use metallic-clad card stock.)
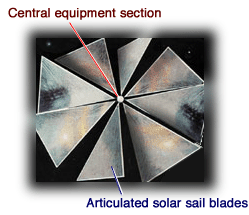
- A blue highlighter pen, to color the photovoltaic panels on the Central Equipment Section.
- String or thread for hanging your completed model, a foot or more in length.
- Time and patience. Plan to spend several hours working on your Cosmos-1 spacecraft scale model. Remember that extra care will result in a nice, accurate representation of humanity's first operational solar sail spacecraft.
To Build your Cosmos-1 Scale Model Regular Version...
- Read through all the Assembly Instructions completely, before beginning assembly. As you read, you may have ideas to improve your model, or to make assembly easier.
- Download the scale model parts in the ".pdf" file linked below. You can read the file using the Adobe Acrobat Reader with just about any kind of computer. (Here's the Adobe Acrobat Reader, free of charge from Adobe.)
Click Here to Download the Model Parts
- Print the Model Parts on 8.5 X 11-inch (or A4) card stock, using a black and white printer. Notice the one large triangular part, the Solar Sail Blade. You'll need eight of these. Print eight (8) copies, each on its own sheet of card stock. If your printer has a straight-through-feed output tray, be sure to use it to handle the stiff card stock. If you're using metallic-sided card stock, you may need to let your printer cool a minute between each sheet. You'll also need to print one copy on non-metallic card stock, to obtain a non-metallic copy of the Central Equipment Section part.
- Build the Solar Sail Blades. (Click the link for details).
- Fabricate the hub. (Click the link for details).
- Connect all the blades. (Click the link for details). CAUTION: This step requires use of a hot-glue gun. Adult supervision is required for a young person, to avoid painful burns.
- Add the Central Equipment Section. (Click the link for details).
That's it! We hope you enjoy your Cosmos-1 scale model. If you do, please tell your friends, family, and co-workers about it. Drop us a line if you'd like to provide some feedback about this model project.
On to the Next Topic...
BACK TO THE SCALE MODEL HOME PAGE
