*
3. ASSEMBLE THE SCIENCE BOOM.
View the whole assembled model
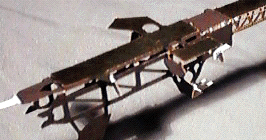
- From sheet C, release the SCIENCE BOOM. Hold it so that the letters face up. Fold down the two outboard truss panels by putting a crease in each of their six hinge-points. The boom becomes U-shaped in cross-section. Fold the unmarked rectangular bottom panel over to close the box structure, and insert its black tab into the white slot. Secure with glue.
- Fold up the two legs supporting panel X at their hinge points, out away from the boom, so the panel is perpendicular to the truss panel. Now fold up panel W perpendicular to panel X. This represents a science instrument (see fact sheet).
- Fold out panel Z-Y at its hinge point, to be perpendicular to its connecting trusses. Now fold up panel Z perpendicular to panel Y. This represents a science instrument (see fact sheet).
- Release the MAG BOOM (magnetometer boom) from sheet A. Fold both yellow truss panels down lengthwise away from the gold, along their hinge-points, so that the boom becomes triangular in cross section. Bend the five tabs on one side over the edge of the other side to hold the shape. Secure with glue.
- Fit the inboard end of the MAG BOOM into the square-box end of the SCIENCE BOOM, keeping the gold-foiled side of the MAG BOOM facing up. Secure with glue, making sure the MAG BOOM extends straight out of the SCIENCE BOOM.

- Release the SCI BOOM SUNSHADE from sheet A. Keeping the foil side up, glue in place along the top of the SCIENCE BOOM. The long central gold rectangle covers just the trusswork on top of the SCIENCE BOOM. The end with the small protruding gold rectangles is on the outboard end, to shade the two science instruments. Bend the two tiny white ovals down about 100 degrees. They represent a mirror and a target plate the SSI uses for calibration (see fact sheet).
| GO ON TO THE NEXT STEP |
| INSTRUCTIONS FIRST PAGE |
| SCI HOME PAGE |
