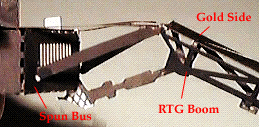
8. ATTACH THE RTG BOOMS TO THE SPUN BUS.
View the whole assembled model
- Set the SPUN BUS down with the letters and numbers facing up. Apply a little glue to the crosshatched tip of the boom support numbered 1. On RTG BOOM 1, apply a little glue to the top (same side as the gold) of the end of the white tab...
- Holding RTG BOOM 1 gold side up, insert the white tab OVER the crosshatching at the end of boom support 1 on the SPUN BUS, and UNDER its black crossmember. Adjust so RTG BOOM 1 is straight out from the center of the SPUN BUS. Let the glue dry.
- Position the crosshatched L-shaped tab of the RTG BOOM against the bottom edge of the SPUN BUS so it engages the edge, right at the bottom of the hinge section joining two bays of the SPUN BUS. Apply glue to hold it there, and let it dry.
- Repeat the above three steps to attach RTG BOOM 2 to boom support 2 on the SPUN BUS.

| GO ON TO THE NEXT STEP |
| INSTRUCTIONS FIRST PAGE |
| SCI HOME PAGE |
