5. INSTALL THE FORWARD HANDRAIL.
View the whole assembled model
This is one of several handrails which help make it convenient for astronauts to handle and service the HST on orbit.

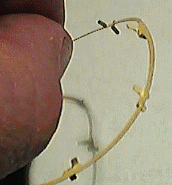
- From sheet B release the circular FORWARD HANDRAIL. There are eight pairs of prongs facing inward. Bend each prong of one of the pairs in opposite directions, one up and one down, and fold them all the way back. Repeat with the remaining seven pairs. Try not to distort the yellow ring, and be very careful not to tear it. (If you do tear the ring, it can easily be glued back together; just let it dry thoroughly before proceeding.)
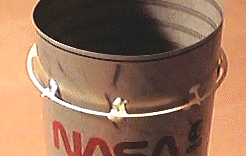
- Slip the FORWARD HANDRAIL over the front of the tube. It should not be too tight a fit. Slide it about halfway down to the word NASA. Pinch the yellow ring near each of the pairs of prongs so that the prongs fold down against the tube. This should cause the ring to tighten against the tube.
- Slide the FORWARD HANDRAIL up until the yellow ring is 1/2 inch (13mm) below the black line near the end of the tube. Rotate it until one pair of prongs is over the seam in the tube. Adjust parallel with the black line. Secure with a droplet of glue at each prong.


