|
Hubble Space Telescope
Space Craft SCIENCE KIT
Assembly Instructions
Web Version 3.4
NASA Logo used by permission.
|

|
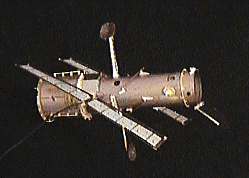
The photo shows an assembled HST Space Craft (tm) SCIENCE KIT. Click the image for more views. These instructions are for use with the "Onine Kit" laser-cut Parts Sheets.
YOU'LL NEED THE FOLLOWING:
- Small scissors, such as manicure scissors, to release the parts from the laser-cut parts sheets.
- Wooden toothpicks for applying glue.
- A metal-edged ruler or straightedge to help make some folds.
- A pencil.
- A stiff wooden ruler to help in pressing the seams together when assembling cylindrical parts.
- Glues. Use regular white glue (Elmer's Glue-All or equivalent), or, perhaps better, a thick white glue, sold in art stores and fabric stores, called "TACKY GLUE" (Aleen's Original or equivalent). Additionally, a lower moisture glue, such as a Glue Stick (UHU Brand or equivalent) will be required for gluing the telescope tube and aft shroud. If you're comfortable using a hot-glue gun, you may find this helpful for some parts, especially for attaching the HGA booms in Step 7.
- Tweasers or long-nose pliers.
- A coaster or other small flat object weighing 2 or 3 ounces, to help glue some parts.
- Space. Set up a well lighted, comfortable work area, with room to set glued parts to dry.
- Time. Plan to set aside a few hours for unhurried assembly. It may take five hours or more to assemble your HST Scale Model.
- Patience. There may be some trying times. If so, remember that extra time and care will pay off with a surprisingly accurate, and handsome representation of NASA's HST, a sophisticated spacecraft.
- Optional:
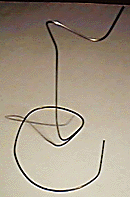
 You may wish to fashion a stand for your model. A simple stand can be made by bending a length of wire. Brass wire from a hobby store, or steel wire such as coat hanger wire, will work. About half a meter, or 18 inches, in length is plenty. Such a stand may also be convenient to support parts during assembly. If you choose to work with wire, be cautious to prevent eye injury, especially when cutting the wire, when fragments may fly. This image shows a stand made of soft iron wire obtained from a craft store.
- Optional: You might find it helpful to use an electric hair drier to set the glue in some places. If you do, be very careful not to blow the pieces apart!
BEFORE BEGINNING ASSEMBLY:
- Examine all the parts on both sheets, and read their names.

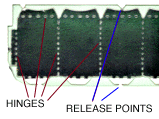
- Notice the RELEASE POINTS you'll need to clip to release parts from the parts sheets. Also notice HINGES, where parts will be folded.
- Read all of these instructions. Compare model parts with the illustrations.
- Have a look at the HST Fact Sheet, and browse the Space Telescope Science Institute web site.
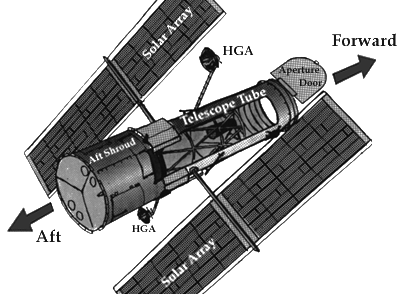
- Get your bearings: Examine the image of the spacecraft below. For the purpose of these instructions, note the FORWARD and AFT directions shown in the image. "Inboard" will be defined as toward the center of the spacecraft, and "Outboard" is defined as away from the center.

IN GENERAL:
- If these instructions don't say which way to fold a piece, it may be folded in either direction.
- After releasing a piece from the Parts Sheets, trim off any remaining release points, but be careful not to remove tabs to be used in assembly.
TO ASSEMBLE YOUR MODEL:
Click on each step below for illustrated step-by-step instructions, or use this single PDF file (then return to this page to read "About your HST Model" below).
Congratulations!
YOU'VE FINISHED YOUR HUBBLE SPACE TELESCOPE Space Craft (tm) SCIENCE KIT.
About your HST Model
Its scale is about 1/65. Silver-colored thermal blankets are depicted, hiding some detail on the outside of the telescope's forward shell and light shield, but presenting a nearly accurate appearance of the telescope. The solar panels on the actual spacecraft can rotate about their support arms. This is not possible to do on your model. The high-gain antennas on the spacecraft can be pointed in nearly any direction independently. The HST's primary mirror is slightly hyperbolic, not the flat surface depicted in your model. The secondary mirror also has curvature.
Now that you're familiar with all of the spacecraft's major structures and its science instruments, be sure to browse the Space Telescope Science Institute web site to learn more about the spacecraft, its mission, and all about its many, many discoveries. Also, be sure to see the following from SCI:
| TOP OF THIS PAGE |
|


 You may wish to fashion a stand for your model. A simple stand can be made by bending a length of wire. Brass wire from a hobby store, or steel wire such as coat hanger wire, will work. About half a meter, or 18 inches, in length is plenty. Such a stand may also be convenient to support parts during assembly. If you choose to work with wire, be cautious to prevent eye injury, especially when cutting the wire, when fragments may fly. This image shows a stand made of soft iron wire obtained from a craft store.
