|
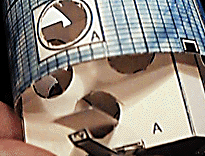
7. INSTALL THE SOLAR PANEL.
View the whole assembled model

- On the SOLAR PANEL, find the circular opening marked A. On the SPACECRAFT BUS, find the rectangle labelled A. Insert the top of the SPACECRAFT BUS up through the bottom of the SOLAR PANEL and work rectangle A out through hole A. Work the two remaining rectangles out theit respective holes.
- Glue the protruding rectangles A, G, and M. to the lowest point they will reach in the SOLAR PANEL's holes A, G, and M.
- Adjust the arms which end in tabs Z so that they go straight out from the SPACECRAFT BUS. There are three at the bottom, and two at the top. Ignore the arm marked o for now. Adjust all tabs Z so they contact the inside of the SOLAR PANEL, and glue them there.
- Pull the arm marked o up to the top edge of the SOLAR PANEL, bending it where it attaches to the SPACECRAFT BUS. Let it extend past, and rest against the top of the SOLAR PANEL. Glue it where it meets the SOLAR PANEL. This arm supported the magnetometer, hinged up to meet it, during launch, while its boom was stowed.
- Straighten up the assembly before the glue dries, adjusting so that the ANTENNAS rise perpendicular to the top of the SOLAR PANELS, and that the only contacts with the SOLAR PANELS are by rectangles A, G, and M, and by tabs Z and tab o. Let the glue dry before proceeding.
|

