|
Lunar Prospector Spacecraft
1/25 Scale Model
Assembly Instructions
Version 2.0
|

|
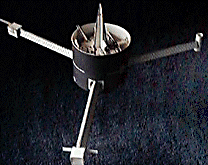
This is a project which is probably not appropriate for people younger than about ten years of age, depending on skill and motivation. The image above shows a completed scale model. Click on it for more views of the model.
Two Parts Sheets are available to download from this web site.
YOU'LL NEED THE FOLLOWING:
- White paper card stock (also called "cover" stock, about the thickness of a postcard) which your computer's printer can accept. If you have a sheet of glossy card stock, you might wish to use it for the SOLAR PANEL part on Sheet 1, to simulate the glossy appearance of the solar cells.
- Scissors, to cut most parts from the parts sheets.
- An art knife, such as X-Acto #11, with a sharp new blade, and a proper pad on which to cut. This will be needed to cut some parts from the parts sheets, and to make small detail cuts. Adult supervision is required for children using this and other sharp tools. Caution: one can injure oneself, and the furniture, with an art knife.
- Wooden toothpicks for applying glue.
- Glues. Use regular white glue (Elmer's Glue-All or equivalent). You might also try a thick white glue, sold in art and fabric stores, called "TACKY GLUE" (Aleen's or equivalent). A low-moisture glue, such as a glue-stick, will also be needed.
- A dark blue ink felt-tip pen for coloring solar cells on the SOLAR PANEL.
- Space. Set up a well lighted, comfortable work area, with room to set glued parts to dry.
- Time. Plan to set aside several hours for unhurried assembly. It may take four hours or more to assemble your Lunar Prospector Scale Model.
- Patience. There may be some trying times. If so, remember that extra time and care will pay off with a surprisingly accurate, and handsome representation of NASA's Lunar Prospector, a sophisticated spacecraft.
- Optional: A small piece of aluminum foil would add some realism to your model. A square of about 5 cm, or 2 inches, would be more than enough.
- Optional: For additional detailing, use a metalic-gold ink and a metallic-silver ink pen to add small touches of detail where suggested.
- Optional: Spherical propellant tanks are represented in your model by flat circles. Although they are difficult to see once assembly is complete, you might want to locate or fabricate some 3-dimensional objects to replace them in your model. A ball of crumpled aluminum foil would work well, especially since the spacecraft's tanks are covered with aluminized thermal blanketing that looks somewhat like aluminum foil.
- Optional:
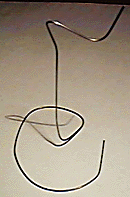
 You may wish to fashion a stand for your model. A simple stand can be made by bending a length of wire. Brass wire from a hobby store, or steel wire such as coat hanger wire, will work. About half a meter, or 18 inches, in length is plenty. Such a stand may also be convenient to support parts during assembly. If you choose to work with wire, be cautious to prevent eye injury. This image shows a stand made of soft iron wire obtained from a craft store. You may wish to fashion a stand for your model. A simple stand can be made by bending a length of wire. Brass wire from a hobby store, or steel wire such as coat hanger wire, will work. About half a meter, or 18 inches, in length is plenty. Such a stand may also be convenient to support parts during assembly. If you choose to work with wire, be cautious to prevent eye injury. This image shows a stand made of soft iron wire obtained from a craft store.
- Optional: You might find it helpful to use an electric hair drier to set the glue in some places. If you do, be very careful not to blow the pieces apart.
BEFORE BEGINNING ASSEMBLY:
- Download and print the two Parts Sheets. They need to print on white card stock. You might also wish to print these instructions, if it isn't convenient to refer to your computer during assembly.
- Examine all the parts on both sheets, and read their names.
- Read all of these instructions. Compare model parts with the illustrations.
- Have a look at some information about the Lunar Prospector Spacecraft.
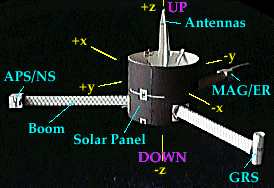
- Get your bearings: Examine the image of the spacecraft below. For the purpose of these instructions, "Up" will be defined as toward the COMMUNICATIONS ANTENNAS shown in the image. "Down" will be defined as toward the other end of the spacecraft. This is the basis for references to "Top," Bottom," "Above," Below", etc. in the instructions "Inboard" is defined as toward the center of the spacecraft, and "Outboard" is defined as away from the center. The spacecraft's X, Y, and Z axes are also illustrated for information.

IN GENERAL:
- Most folds will be made in the direction away from the printed side, leaving the printed side facing out. There are a few exceptions, which are clearly mentioned.
- Score for folding, where directed.
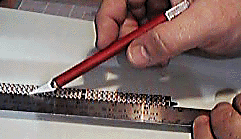
 Scoring will help make a neater model, with straight, clean folds. To score a part, place a straight edge along the line on the part as instructed, then lightly scratch along the line with an art knife, guided by the straight edge. Be careful not to cut through the paper, but just break the surface. After scoring, the fold will always be in the direction away from the scored side.
TO ASSEMBLE YOUR MODEL:
Click on each step below for illustrated step-by-step instructions. Sections marked with a * may be accomplished at the same time if two or more people are working on assembly, or if you wish to work on one section while glue dries on another.
Congratulations!
YOU'VE FINISHED YOUR LUNAR PROSPECTOR SPACECRAFT MODEL.
Now that you're familiar with all of the spacecraft's major structures and its science instruments, be sure to browse the Lunar Prospector web site to learn more about the spacecraft, its mission, and its discoveries.
ABOUT YOUR LUNAR PROSPECTOR SPACECRAFT MODEL:
Your model's scale is approximately 1/25. The model's three SCIENCE INSTRUMENT BOOMS can support themselves in one G, while the spacecraft's booms, made of thin fiberglass trusswork, cannot.
Please feel free to copy this scale model, and disseminate it widely.
Have you built the Cassini Spacecraft 1/37 Scale Model, and the Galileo Spacecraft 1/45 Scale Model?
Model design by Dave Doody
Thanks to Lisa Chu Thielbar of the Lunar Prospector Mission for reviewing and polishing.
Not produced at taxpayer expense.
24 February, 1998
Concurrent Steps
Sections marked with a * may be accomplished at the same time if two or more people are working on assembly, or if you wish to work on one section while glue dries on another.
| TOP OF THIS PAGE |
|


 You may wish to fashion a stand for your model. A simple stand can be made by bending a length of wire. Brass wire from a hobby store, or steel wire such as coat hanger wire, will work. About half a meter, or 18 inches, in length is plenty. Such a stand may also be convenient to support parts during assembly. If you choose to work with wire, be cautious to prevent eye injury. This image shows a stand made of soft iron wire obtained from a craft store.
 Scoring will help make a neater model, with straight, clean folds. To score a part, place a straight edge along the line on the part as instructed, then lightly scratch along the line with an art knife, guided by the straight edge. Be careful not to cut through the paper, but just break the surface. After scoring, the fold will always be in the direction away from the scored side.