|
1. ASSEMBLE THE TELESCOPE PIER.
View the whole assembled model
- From one of the two Sheets BC, release the large blue part labeled PIER 1/2.
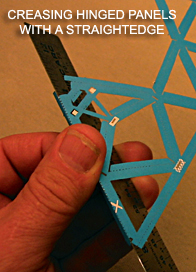
Fold all the hinged panels back away from you in one direction. There are 16 of them. Use a straightedge to help bend them neatly, by pressing the steel edge into the hinge, and creasing against it, as shown in the image at right.
When aligning a straightedge to a laser-cut hinge, you might find it helpful to light it from behind, shadowing the straightedge against the hinge.
Don't forget the small hinged panel up near the apex of the largest triangle.
Lay the PIER 1/2 part down on a flat surface and carefully press all the folds down to establish creases. Be very careful not to tear the paper.
- Hold the part by the large triangle (similar to the image above), and fold back the section on the right side. Fold in the same direction as you folded all the hinged panels. The piece will bend at the locations pointed out as A and B below. Pinch a crease into the fold at those points, and then adjust the panel to be at right angles with the large triangle. The piece can now stand up on a flat surface, as shown:

- The next task is to fix a perfect right-angle bend into the part. Use the brown corrugated cardboard sheet from your kit, and fit the PIER 1/2 piece to it as shown in the image below. The idea is to fit the corner of the cardboard into the corner of the piece such that the crosshatched tab on one folded panel lays over the adjacent folded panel where it can be glued to hold the 90° bend. You can see the corner crosshatched tab in the image, at the corner of the piece.
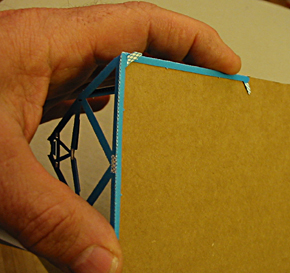
Once you have the part fit to the cardboard form as shown, glue the crosshatched tab to the panel it touches. Be careful not to glue anything to the cardboard! Just hold the cardboard in place long enough to glue the crosshatched corner tab in place.
Once the glue has dried, and you have removed the cardboard form, trim off the excess crosshatched tab.
- Repeat the previous 3 steps, so you'll have two pieces that look exactly the same (do not make a mirror image).
+
+
+
+
+
- Now to join the two PIER 1/2 pieces together:
 Set the two PIER 1/2 pieces near each other so their bases form a rectangle. Notice that one folded panel at the end of each piece has a white line printed on it. Apply glue and overlap this onto the panel on the second piece which has a printed white X. See the image at right.
Repeat this with the other corner of the PIER, carefully adjusting the pieces so that the resulting PIER will have a nicely rectangular base, and the two large triangles will be vertical.
- Glue the two remaining crosshatched tabs in place at the bottom corners to hold the PIER's shape. Make sure the bottom will remain flat, with no glue blobs to make it tip or rock when you later set it upright. Let the glue dry.
- At the apex of each of the large triangles, there are two blue tabs sticking up. Fold them down 90 degrees. This is where the telescope will balance, later. For reference, look closely at the photograph on the front of Parts Sheet A.
- Below the apex of both large triangles, notice two square white tabs. Bend these 4 tabs outward 45 degrees. These tabs will engage a platform support shortly.
+
+
+
+
+
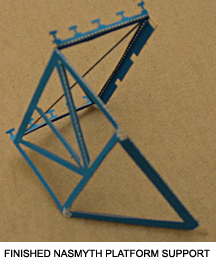
- From one Sheet BC, release a NASMYTH PLATFORM SUPPORT. While clipping release points, stay close to the outer edge near the parts sheet. In particular, there is a white pointed tab that must remain attached to the blue part; don't clip it off by mistake.
Notice there are 11 hinged panels. There is also a hinge across the center of the part, that will be addressed later. Two of the panels have five  -shaped protrusions. Fold all the hinged panels except these two, back away from you: nine little rectangular panels. -shaped protrusions. Fold all the hinged panels except these two, back away from you: nine little rectangular panels.
Once you've got all nine panels folded, flatten the part down on your work surface to crease all the folds sharply. The folded panels will then spring back a little, offering some structural strength to the truss-work members.
Now adjust the fold of the end panel, which has two square notches, to be 90 degrees.
Fold the two panels with -shaped projections up toward you 90 degrees.
Identify the hinge going across the part near the middle, and place a neat crease in this center hinge, bending in the same direction as most of the hinged panels. Bend a little more than 90 degrees.
- Bend the triangular end section in slightly in the same direction. It will bend naturally at the two crosshatched slots. Pinch a slight crease there.
+
+
+
+
+
- Now to attach it to the PIER:
Position the NASMYTH PLATFORM SUPPORT so that its two square notches hook onto the two white tabs on one end of the PIER, and its single white tab reaches toward the crosshatched slot at the base of the PIER. Apply glue between the square notches and press onto the PIER.
Be sure the NASMYTH PLATFORM SUPPORT is level with the PIER, and the two notches are fully engages with the two white tabs. Long-nose pliers may help squeeze the glued parts together.
The white tab at the bottom of the NASMYTH PLATFORM SUPPORT will fit into the crosshatched slot at the base of the PIER, Insert it there now, but don't glue it yet. It will be glued after several more steps have been done.
- From one Sheet BC, release a SIDE SUPPORT. Again, be careful not to cut off the long white tabs. Clip the release points out close to the parts sheet.
Fold the two hinged panels over in the same direction.
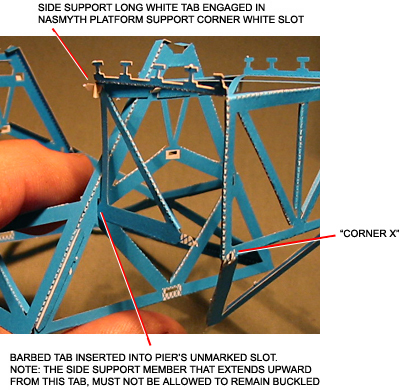
Insert its long white tab into the corner white slot in the NASMYTH PLATFORM SUPPORT.
Insert the SIDE SUPPORTs' blue barbed tab into the unmarked slot in the PIER triangle side. NOTE: if the SIDE SUPPORT tends to buckle, you may need to lengthen the PIER's slot where the SIDE SUPPORT's barbed tab fits. If so, use a sharp art knife and carefully open the slot no more than a millimeter downward.
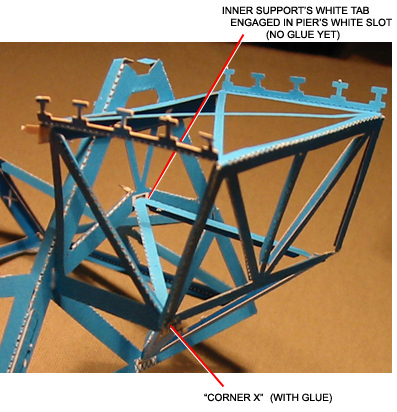
Insert the SIDE SUPORT's crosshatched tab into the crosshatched slot in the NASMYTH PLATFORM SUPPORT. For reference in the next step, let's call this "CORNER X".
Apply a droplet of glue to hold these three tabs in their slots. (The other SIDE SUPPORT will not be installed until after the next step.)
- From one Sheet BC, release an INNER SUPPORT. Be careful not to cut off the long white tab. Fold its two hinged panels over in the same direction.
On the PIER, notice that near the center of the large triangle, there there is a white slot.
- Working inside the NASMYTH PLATFORM SUPPORT truss-work, insert the INNER SUPPORT's white tab into the white slot near the center of the PIER's large triangle. Tweezers, or long-nose pliers, may be useful here.
Let one of the two blue ends of the INNER SUPPORT rest inside "CORNER X". Place a droplet of glue to hold it inside "CORNER X". Don't glue the white tab yet.
- From one Sheet BC, release the other SIDE SUPPORT. Install it in the other side of the NASMYTH PLATFORM SUPPORT as in previous steps.
Now apply glue to every remaining tab/slot on the SIDE SUPPORTs and INNER SUPPORT. Apply glue to the white tab where it enters the crosshatched slot at the base of the PIER.
Let all the glue joints dry. After the glue is dry, snip off the ends of tabs that protrude through their slots.
+
+
+
+
+
- Install the other NASMYTH PLATFORM SUPPORT, with its SIDE SUPPORTS and its INNER SUPPORT, on the other end of the PIER, by repeating the last several steps.
- Optional, to add extra realism: Snip off all the ten of the -shaped pieces on each NASMYTH PLATFORM SUPPORT (they represent the cross sections of five -beams on each side). In their place, lay down five 58-mm (2.25-inch) lengths of blue plastic -beam, between where the pairs of -shaped pieces were. Make parallel. Glue in place.
+
+
+
+
+
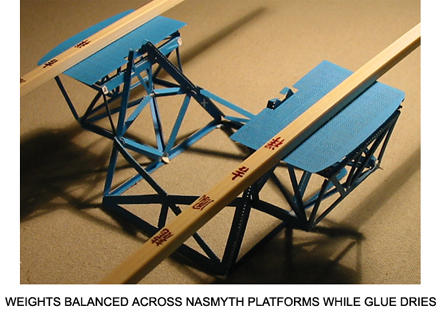
- From Sheet BC release a NASMYTH PLATFORM. Lay it down on top of the NASMYTH PLATFORM SUPPORT, on top of the -shaped pieces. Its curved edge faces outward, and its rectangular notch straddles the apex of the PIER's large triangle. Secure with a drop of glue at the top of each -shaped pieces (or optional -beams). Repeat with the remaining NASMYTH PLATFORM on the other side.
While the glue is drying, carefully balance a lightweight piece of wood, such as a popsicle stick or a chopstic, atop both NASMYTH PLATFORMs, taking care not to tip the PIER over. This will help keep the NASMYTH PLATFORMs level and in contact with the NASMYTH PLATFORM SUPPORTs.
After all the glue has thoroughly dried, take a blue-ink permanent marker pen and color in all of the white and crosshatched markings that are still visible on the pier.
THIS COMPLETES THE TELESCOPE PIER.
View the whole assembled model
| GO ON TO THE NEXT STEP |
| INSTRUCTIONS FIRST PAGE |
| SCI HOME PAGE |
|