|
2. ASSEMBLE THE ELEVATION RING.
View the whole assembled model
- From both Sheets DE, release an ELEVATION RING. Place both pieces down in front of you, oriented as shown below. Either side can face down, as long as you see them oriented like this:
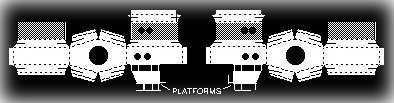
- From this orientation, fold all hinged panels back away from you 90 degrees, except the ones at the extreme left and right ends of each piece. Do not bend the platforms or their attachments yet (these are called Bent Cassegrain Platforms), and don't worry about the two vertical hinges between sections. Take care to make straight folds with sharp creases, using a straightedge. After each fold, flatten its crease by pressing it down against your work surface. There are 16 folds to make on each piece.
Double check that all folds are in the same direction, starting from the orientation in the sketch. You should have two mirror-image folded pieces. When gluing in the next steps, it will be important to keep surfaces perpendicular. The ELEVATION RING is central to the telescope, and will affect neatness of the rest of model.
- Pick up one ELEVATION RING piece. Adjust all of the folds to be 90°. You'll notice it naturally forms some boxes.
 Identify the crosshatched panel near the grey panel with two circular holes, and observe the box it will make with all its folds at 90°. Apply glue to the crosshatched area and adjust it into a neat, rectangular box shape. Insert a popsicle stick into the box to help press the seam together. Keep the box shape nice and even.
- At the other end of the piece, apply glue to the crosshatched panel. Bring the black surface into contact with it. Adjust into a neat, rectangular box shape. Insert a popsicle stick into the box to help press the seam together.
- From one Sheet DE, release an ELEVATION RING INNER PANEL and fold the two U-shaped hinged panels up towards you, to get them out of the way for now. Set it down, hinged panels up, onto the four remaining crosshatched panels on the ELEVATION RING to see how it is going to fit.
- Apply glue to the four remaining crosshatched panels on the ELEVATION RING and position the INNER PANEL down onto the glue. The narrow ELEVATION RING panels which have slots in them are perpendicular to the INNER PANEL. You can bend back the two completed box sections to allow you to insert a popsicle stick in under the INNER PANEL and press the seams together. Make sure all the panels are neat, and that the large central hole in the INNER PANEL lines up directly opposite the large central hole in the white panel.
+
+
+
+
+
- Complete the other ELEVATION RING section by repeating the previous steps.
- Set the two ELEVATION RING sections down in front of you, black sides up, in the orientation shown below.

On the right-hand piece: cut off the hinged panel on its left end, cutting exactly through the hinge. This is illustrated above with a red line.
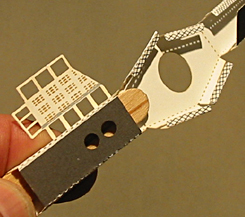
 On the left-hand piece: bend the hinged panel on the right end, to make it flexible. Apply glue to the bottom of this hinged panel. Slip it into the right-hand piece, where you made the cut, just enough to join the two parts edge-to-hinge. Keep the two pieces straight in line. See the image at right.
The vertical panels should form a V shape, touching at the base of the V, but not overlapping. Keep the two pieces straight in line with each other. Press the seam together. Let dry.
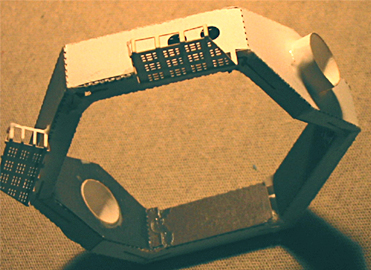
- Bend the joined pieces into a hexagonal ring with the black surfaces inside. Cut off one of the two remaining hinged end panels, apply glue to the other, to join and complete the ring. Hold together until the glue dries.

+
+
+
+
+
- You will now need the hexagonal cardboard form described under "Before Beginning Assembly" on page 1. Insert the form into the middle of the ELEVATION RING. Adjust the form to be centered vertically in the ELEVATION RING. It should fit snugly enough to stay in place, without straining or deforming the ELEVATION RING.
Whether your cardboard form fits properly will depend on exactly how all the folds and glue seams turned out. If there is too much open space around the form, consider wrapping the form in a rubber band around its perimeter before inserting it in the ELEVATION RING. If the form just does not fit well, you'll have to make a new hexagonal cardboard form with a slightly different size. The objective is to provide a regular hexagonal shape to the ELEVATION RING while you apply some more glue to the part. Note: the cardboard form must NOT be glued inside the ELEVATION RING.
- For nomenclature, the ELEVATION RING now has a top and bottom. The top and bottom edges are the narrow panels which have slots in each of their 6 corners. The bottom edge is the one from which the two platforms hang. The opposite edge is the top.
- Examine your ELEVATION RING with the form inside. Note the following:
- When you look through the circular holes in the ELEVATION RING, you should see the edge of the cardboard form exactly in the middle. Adjust if necessary.
- On the top and bottom edges of the ELEVATION RING, the six corners, where there are slots, will have varying amounts of space between panels. Some meet exactly, others have gaps.
- Some of the slots may have squeezed together enough that inserting tabs into them later may be difficult or impossible.
- The U-shaped panels on the ends of both ELEVATION RING INNER PANELs are still not glued in place inside the ring.
The next few steps will address the above observations. The result will be a firmly glued ELEVATION RING that will hold its regular hexagonal shape strongly after the glue dries. The slots will all be open so they can be used later.
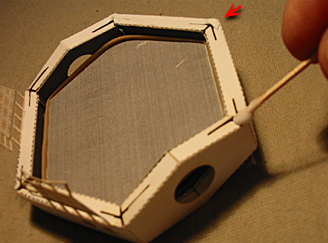
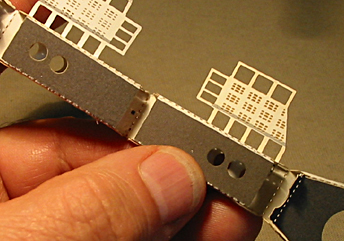
- Apply glue to all the diagonal seams in the ELEVATION RING, six on top, and six on the bottom. DO NOT obstruct the slots in the top and bottom of the ELEVATION RING. Keep a dry toothpick, or an art knife, on hand to remove any glue that might obstruct a slot. If there are any wide gaps in the seams, carefully bridge them with glue, and perhaps some tiny slivers of paper. Let the glue dry completely hard.
In the image to the right, note the paper sliver (red arrow) being used to bridge a particularly wide gap. Also note that the cardboard hexagonal form has been wrapped with a rubber band to help it fit snugly inside the ELEVATION RING.
- After the glue is hard, remove the form from the center of the ELEVATION RING and discard it. Apply glue to close up the bends inside the ELEVATION RING and let dry completely.
- Apply droplets of glue to the U-shaped ELEVATION RING INNER PANELs edges to hold them in place against the inside of the ring.
+
+
+
+
+
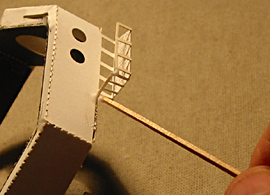
- Bend each platform up and outward 90 degrees, making a crease at the tiny grey marks near the bottom of each platform's 5 supporting struts.
- Bend each platform's two railings up 90 degrees. Try to straighten the platform and railings so they are very nearly perpendicular, and so the platform is very nearly perpendicular to the side of the ELEVATION RING. Join the railings with a drop of glue where they touch each other. Join the railing with a drop of glue to the ELEVATION RING where it touches. See image at right.
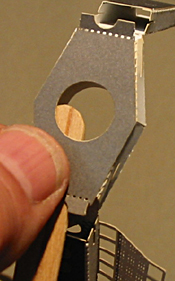
- From one Sheet BC, release an ELEVATION BEARING. Curl it so its ends touch. It might help to roll it around a pen. Insert the rolled piece into one of the large circular holes in the ELEVATION RING. To do this, curl it till its ends overlap, slip it through both holes, and then uncurl it until its ends are exactly touching each other. It will snap into place and remain there snugly. See below.
- Work the ELEVATION BEARING outward slightly until its inside end is almost flush with the black INNER PANEL. Secure with glue both inside and outside the ELEVATION RING. Repeat with the other ELEVATION BEARING.
If the ELEVATION BEARING isn't exactly perpendicular to the ELEVATION RING, it will hardly be noticeable once the model is finished, as it will be partly hidden by the TELESCOPE PIER.
THIS COMPLETES THE ELEVATION RING.
View the whole assembled model
| GO ON TO THE NEXT STEP |
| INSTRUCTIONS FIRST PAGE |
| SCI HOME PAGE |
|