|
Keck Telescope Space Craft ® SCIENCE KIT
Assembly Instructions
Version 7.2
(12/2017)
Having the instructions online permits continuous
improvements to them, based on feedback
from SCI customers. We'd be pleased if you
were to decide to offer any suggestions.
AN EXTRAORDINARY KIT
Your Keck Telescope Space Craft ® SCIENCE KIT is a precision laser-cut, lithographed, and metal-foil stamped set of parts, that will allow you to create a handsome and accurate scale model of one of the world's most advanced astronomical instruments. Indeed, the twin Keck Telescopes in Hawaii are the first of their kind, using computer control to generate the parabolic shape of an arbitrarily large segmented primary optical mirror. Until Keck, a telescope's aperture was limited by the physical constraints of a single glass casting.
Your model, whose design was kindly reviewed and approved by the Keck Observatory staff in 1995, illustrates the Keck Telescope's historic breakthrough design that is now being carried forward into larger and larger telescope designs worldwide.
The Keck Telescope's design and construction were tremendous feats of science and groundbreaking engineering. And assembling your model, while not quite as difficult as designing and constructing a ground-breaking telescope, will take some time and care. Just because your model is made of paper, and just because it was inexpensive, doesn't mean your results won't be truly extraordinary.
We hope you'll enjoy the unique experience that is before you.
(A) CONSIDER 3D PRINTING
Be sure to review SCI's offering of 3D Print Files, even if you don't have access to a 3D printer. Selected components for some Space Craft ® SCIENCE KITs are now available as .STL files for you to download either free of charge, or for a nominal charge. Once you have the .stl file, it's very easy to send it to any of a number of professional 3D-print companies, who will then send your component to you in a box after they print it.
(B) ADDITIONAL ITEMS YOU'LL NEED
To do the best possible job assembling your high-fidelity scale model of the revolutionary Keck Telescopes, take some time to gather all of the following items before proceeding with assembly:
- Small scissors, such as manicure scissors, to clip parts from the parts sheets.
- Toothpicks for applying glue.
- Glue. Use regular white glue (Tessa eco-friendly vegan glue) or equivalent.
- A popsicle stick for pressing together glued surfaces within the ELEVATION RING.
- A wooden pencil with a hexagonal cross-section.
- A small pair of long-nose pliers.
- A metal ruler or straightedge, to help make some tricky folds.
- A blue-ink permanent marker pen for touch-up on TELESCOPE PIER, once assembly is complete. The exact color should match the blue on Parts Sheet B/C.
- Space. Set up a well lighted, comfortable work area, with room to set glued parts to dry. Having a rough surface such felt, or even a hand towel, will help you set and balance some parts in position "just so" while their glue joints dry thoroughly.
- Time. Plan to set aside several hours for unhurried assembly. To achieve the best results with your Keck Telescope model, you might want to plan to spend a few hours a day over a period of several days.
- Patience. While some parts of this kit might assemble easily due to its advanced design, there may be some trying times. But try to keep in mind that some extra time and care will eventually pay off with a surprisingly accurate, and handsome representation of what is in reality a very complex, revolutionary-design, large-aperture telescope that serves the world's scientific community.
- Optional, to add extra realism below the Nasmyth Platforms: ten 58-mm (2.25-inch) lengths of blue plastic
 -beam, about 4 mm or so in thickness, from a model supply shop, such as a model railroad hobby store. -beam, about 4 mm or so in thickness, from a model supply shop, such as a model railroad hobby store.
- Optional: You might find it good to use an electric hair drier to set the glue in some places. If you do, be very careful not to blow the pieces apart, or scatter them across the room!
- Optional: Download a free 3D Print file for the Elevation Ring instead of using the laser-cut paper version included in the kit; the 3D Printed component has better symmetry and strength.
- Optional: Download a 3D Print file to make the Upper Telescope Tube instead of using the laser-cut paper version included in the kit; the 3D Printed component has better symmetry and strength.
- Optional: You might wish to obtain the clear acrylic Keck Display Dome to protect your assembled model in an observatory-like enclosure.
(C) BEFORE BEGINNING ASSEMBLY:
- Check the contents of your kit. There should be five (5) parts sheets: One Sheet A, two identical Sheets B/C, and two identical Sheets D/E. There is also a sheet of brown corrugated cardboard, unless your kit was shipped in box. Use either this enclosed cardboard, or part of the cardboard box, in the next step:
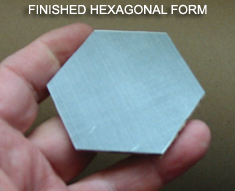
- Make a cardboard form (skip this if you're using the 3D-Print Elevation Ring). Print this PDF image of a hexagon, using a printer that will produce an image at 100.0% size. Check the diameter of the printed hexagon: From corner to corner across the figure must measure 66 millimeters or 2.5 inches (give or take a percent or two). Make adjustments to print size and re-print if necessary to achieve the correct size. (Adobe Acrobat Reader, available to download free of charge, will support viewing and printing.)
Use the printed hexagon as a pattern to carefully cut out a shape from the brown corrugated cardboard in your kit package: trace and cut a piece of corrugated cardboard to the exact shape of the hexagon. NOTE: This hexagon will not become part of your model, but will be a tool for holding the ELEVATION RING in its proper shape while its glue is drying.
Don't discard the rest of the cardboard sheet (or box section) yet. It will be used later, as a form to hold a 90° bend into some parts as they glue.
- Study the Fact Sheet and use it as a reference during assembly.
- Examine the parts sheets and learn the names of all the parts.

- Notice the RELEASE POINTS to be snipped to remove parts. Use small scissors to clip the release points. Make your cut out away from the part, near the parts sheet, leaving some of each release point on the part. You can clean them off later if necessary.
Also, identify HINGES which join segments of some parts for easy folding (see sketch).
- It is important for you to read the whole Assembly Instructions booklet before beginning assembly. Don't start assembling until you have a very good idea of the whole process. Compare model parts with diagrams and assembly steps.
(D) GENERAL NOTES:
- Sections marked with an asterisk (*) below may be largely accomplished at the same time, when two or more people are working on assembly, or when you wish to work on one section while glue dries on another. The last steps in some, however, involve an assembly from another section that may need to be completed.
- Make your folds exactly along the laser-cut hinges, even if the printed shading or marking on the piece is a little off.
- When applying glue, apply it evenly and sparingly. Be sure not to soak the paper with too much glue, and avoid making any parts soggy enough to distort.
- If it matters which direction something must fold, the instructions will say so. If it is not stated, you are perfectly free to fold the part in either direction.
- To make a fold using a straightedge, align its edge under the part's entire hinge, and press along the hinge to make an indentation. Remove the straightedge and complete the fold.
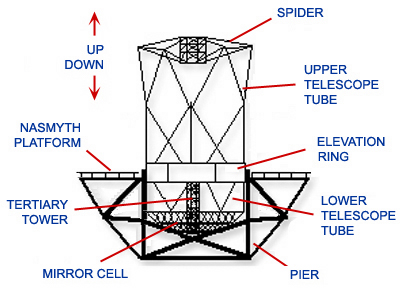
- The sketch at right defines the terms "UP" and "DOWN" as used in the instructions, and identifies the eight structural sections of your Keck Telescope model. You should be able to identify all of them before proceeding with assembly.
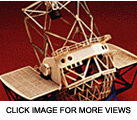
View the whole assembled model
(E) TO ASSEMBLE YOUR MODEL:
Click on each step below for illustrated step-by-step instructions. Sections marked with an asterisk (*) may be accomplished at the same time if two or more people are working on assembly, or if you wish to work on one section while glue dries on another.
| | Assembling the Elevation Ring involves about twenty sub-steps, all of which can be skipped if you can download and print the free 3D-Print File for the Elevation Ring (you'll still have to use the laser-cut Platforms from this step, though).
|
(F) ABOUT YOUR KECK TELESCOPE SCALE MODEL
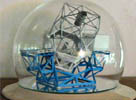 See the Presentation Guide for suggestions for displaying. You might also want to consider an acrylic observatory dome (click image for information) to display and protect your assembled model.
Your model is made of 100% recycled paper (Halopaque Satin 60 lb cover). Its scale is about 1/172, close to model railroad N-scale for human figures, automobiles, etc., that you might wish to obtain.
While great care has been taken to make your model very much like the real Keck Telescopes, the following differences apply:
- The 36 mirror segments are not actually joined, as they are in your model. We connected them so you wouldn't have to deal with 36 little mirrors. The points at which we connected them, however, illustrate the actual locations of sensors which overlap between each mirror segment (see the Fact Sheet). The gap between each real mirror segment is only 3 mm; this gap is exaggerated in your model.
- The thickness of the model's primary mirror is just over half the true scale thickness. The primary mirror in your model is flat, but the real mirror's concave hyperbolic curvature is noticeable. The model's secondary mirror is also flat; the real one has a convex hyperbolic curvature (the tertiary mirror really is flat as in your model).
- A platform, called the Cassegrain platform, similar to the Nasmyth platform but smaller, is not included in your model.
- The azimuth bearing system, which interfaces the PIER with the observatory facility, is not included. See the Presentation Guide for these.
- The vertical triangular members in the mirror cell middle are shortened in your model for assembly convenience. In reality, each triangle extends all the way up to the bottom of each actuator. Some other vertical members between the mirror cell middle and bottom are not depicted.
- The model's forward telescope tube structural members are thicker than scale.
Note that the photo on the front of Sheet A shows grey color NASMYTH PLATFORMs. Their color should really be blue, as are the ones in the kit.
Note: Even if the Keck Telescope Display Dome has an "Out of stock" note on the SCI web page, it is possible that there might still be one or two actually in stock. Check via message, if you like.
View the whole assembled model
| TOP OF THIS PAGE |
| SCI HOME PAGE |
Copyright © 2014 SCI Space Craft
International, Pasadena, California USA. Space Craft and SCIENCE KIT are Trademarks of SCI.
ESTABLISHED 1987. ONLINE SALES SINCE 1993.
SCI KITS ARE MADE IN U.S.A. OF 100% RECYCLED PAPER.
|