*
4. INSTALL THE EQUIPMENT MODULES.
View the whole assembled model
The Support Systems Module and Optical Telescope Assembly Equipment Section house electronics and computers for attitude control, command processing, flight science data processing, etc. They also house components such as radios, batteries, and other support systems.
- IMPORTANT CORRECTION: Refer to the back side of HST Parts Sheet A:
- On the part labelled OTA EQUIPMENT SECTION: Change OTA to read SSM.
- On the smaller part labelled SSM EQUIPMENT SECTION: Change SSM to read OTA.
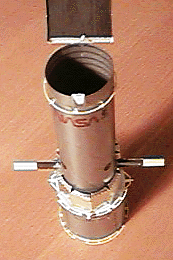
- From sheet A, release the large, silver SSM (Support Systems Module) EQUIPMENT SECTION. Bend so it becomes roughly circular, with the silver outside. Pinch a crease into each of the 9 hinges between the bays. Glue the tab at one end over the other end, connecting the ends together.

- Bend up the 10 bottom (non-silver) hinged sections toward center, forming a bottom shelf at right angles
- Bend the 10 top (silver) hinged sections toward center, forming a top shelf at right angles.
- Apply glue to the bottom shelf and slip the SSM EQUIPMENT SECTION down over the TELESCOPE TUBE until it rests on the PRIMARY MIRROR ASSEMBLY. Rotate so the corner with the tab seam points to the keel fitting. Apply more glue if necessary, and let it dry.
- From sheet A release the SOLAR ARRAY SUPPORT. Holding the side with silver toward you, bend each hinged section down away from you to form triangular struts. Place the tabs into the slots, twist, and secure with glue.
- Apply glue to the crosshatched area. Stand the telescope in front of you, tube up, keel fitting pointed away from you. Set the SOLAR ARRAY SUPPORT down on top of the SSM EQUIPMENT SECTION, the open portion of the U-shaped loop pointing away from you. Position it so the struts are perpendicular to the keel fitting.
- Apply glue where the triangular struts touch the TELESCOPE TUBE. Support the struts so that they extend straight out from the tube, and wait for the glue to dry thoroughly. If you're comfortable using a hot glue gun, this is a good place to use it.
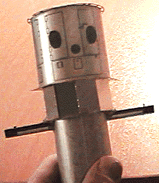
- From sheet A release the silver & yellow OTA (Optical Telescope Assembly) EQUIPMENT SECTION. With silver facing you, crease 10 vertical hinges, folding the panels away from you.
- On the back of the OTA EQUIPMENT SECTION, you'll see 22 black panels. Fold each one back 90 degrees, away from the silver side. Don't bend or break the yellow handrails.
- Three black dots identify the bottom side of the OTA EQUIPMENT SECTION. Apply glue all along the 9 bottom segments, and set it onto the surface identified by three black dots on the SOLAR ARRAY SUPPORT. Wrap it against the tube, from strut to strut. Its yellow handrails face up along the tube. Apply additional glue if necessary and let dry.


