
1/37 SCALE MODEL OF LIGHTSAIL-1

LIGHTSAIL-1's 3U CUBESAT WITH PHOTOVOLTAIC PANELS STOWED; CLICK IMAGE TO ENLARGE.
|

LIGHTSAIL-1's 3U CUBESAT WITH PHOTOVOLTAIC PANELS DEPLOYED; CLICK IMAGE TO ENLARGE.
|
1. Assemble the 3U CubeSat spacecraft.
Have a look at the images at right. They show LightSail-1's 3U CubeSat spacecraft bus. The upper one has its photovoltaic (electricity-generating) panels stowed down alongside the spacecraft's four sides.
The picture below that one shows the spacecraft with its photovoltaic panels deployed.
This latter one, the 3U with photovoltaic panels deployed, is what we're going to represent by cutting and modifying a small piece of plastic tube: the PVC insulation removed from some 12-gauge (AWG) solid electrical wire. Yes, it's cylindrical, where we really would want a box structure. But it will successfully reproduce the key visual features of LightSail-1's appearance from a dstance.
Your model's 3U CubeSat bus is going to be less than 1 cm long (not counting the deployed photovoltaic panels), and 2.7 mm in diameter. To proceed:
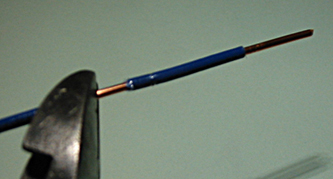 From a piece of solid 12-gauge blue-insulated electrical wire, reomove 3 cm or more of its blue PVC insulation, using wire strippers or diagonal cutters. Discard the wire and keep the insulation to work with. From a piece of solid 12-gauge blue-insulated electrical wire, reomove 3 cm or more of its blue PVC insulation, using wire strippers or diagonal cutters. Discard the wire and keep the insulation to work with.
- Lay the section of blue PVC insulation on your work surface. Using a new #11 X-Acto knife blade, cut off one of its rough ends clean and square.
- Carefully measure the insulation tube and cut squarely to 16 mm in length. This represents twice the length of your 3U bus.
- Grasping the 16 cm long piece of blue tube with your long-nose pliers, slit the tube in half longitudinally with your X-Acto knife, going halfway down its length. Take extraordinary care not to cut yourself. This will eventually represent the photovoltaic panels.
- Fold back one of the slit halves to keep it out of the way, and use your X-Acto knife to slit the other half neatly in two, longitudinally.
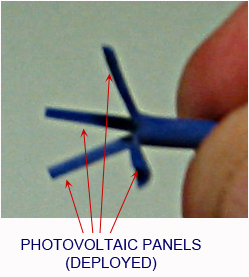
- Slit the other half, so that there are four "frayed" ends of equal length and width. These represent the four deployed photovoltaic panels. Your piece of insulation tube should now look like this:
- Set the shape of the four "panels" to resemble the ones in the image of LightSail-1's deployed panels above. To make the piece retain its shape, run hot water over it while holding the desired shape, then cool and set by running cold water on it.
- This completes your model's 3U CubeSat spacecraft bus.
|
Designed and contributed to members of The Planetary Society by SCI Space Craft
International, Pasadena, California USA.
SCI WAS ESTABLISHED 1987, AND HAS BEEN CONDUCTING SALES VIA THE WEB SINCE 1993.
www.SpacecraftKits.com
|
|

