|
*
1. ASSEMBLE THE SOLAR PANEL.
View the whole assembled model
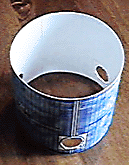
Lunar Prospector's SOLAR PANEL is a cylinder which surrounds the spacecraft. It supports several thousand thin rectangular silicon wafers, called photovoltaic cells (or solar cells) which convert sunlight to electricity. These individual cells are wired in series and parallel, to produce enough electricity to operate the spacecraft as it rotates. The SOLAR PANEL also shades sunlight from the spacecraft bus, to prevent overheating.
- Print Parts Sheet 1 onto a sheet of white card stock. Optionally, print it again on a sheet of glossy card stock so the SOLAR PANEL part will appear glossy like the spacecraft's solar cells.

- Using a blue felt-tip pen, color the solar cells on the SOLAR PANEL. The cells are represented by thousands of tiny recangles, each nearly the same size. Some unevenness in coloring is acceptable, since the individual cells vary somewhat in apparant color (due to reflections). Do not color the various other features on the SOLAR PANEL.
- Cut out the rectangular SOLAR PANEL. Cut out the three circles marked X.
- Option: Add gold metalic ink detailing by filling in the three squares which surround the cut-out circles, and in the two vertical rectangles near the middle of the part. Add silver metalic ink along each of the long, thin rectangles lengthwise along the center of the part.
- Apply low-moisture glue (such as a glue stick) to the white rectangle marked GLUE.
- Wrap the rectangular SOLAR PANEL around into a cylinder, and overlap the area marked GLUE with the opposite end, keeping the printed detail facing out. Adjust into an even cylindrical shape, and squeeze the seam until dry.
- Readjust the shape if necessary, to make the SOLAR PANEL an even cylinder.
| GO ON TO THE NEXT STEP |
| INSTRUCTIONS FIRST PAGE |
|
