|
Juno Spacecraft
1:50 Scale Model
Assembly Instructions
Version 2.1
|

ASSEMBLED MODEL SHOWN
|
Here is a project is for anybody who wants to learn about the Juno Spacecraft and its mission to Jupiter. You'll have a handsome, accurate scale model of the flight-configured spacecraft to show for your effort. It is probably not an appropriate project for most people younger than about ten years of age, though that largely depends on skill and motivation. The image above shows a completed 1:50 scale model.
This model was designed in 2011 by John Jogerst and kindly contributed to the Juno Project. It was adapted to 1:50 from the 1:24 scale model, whose original files are available on the author's website.
An interplanetary spacecraft is an enormously complex and capable robot, having a large variety of components and instruments of every size. The 1:50 scale selected for this site reduces the model's complexity, while keeping the spacecraft's main visual cues intact. Juno's many instruments and engineering components appear on this model as 2-dimensional images. If you would like to add 3-dimensional detail to your model, see "Add optional finishing touches" below.
YOU'LL NEED THE FOLLOWING:
- White paper card stock (also called "cover" stock, about the thickness of a postcard) that your computer's printer can accept.
- A soda straw, which will be cut and installed to become the mounting point for your model.
- An art knife, such as X-Acto #11, with a sharp new blade, and a proper pad on which to cut. This will be needed to cut some parts from the parts sheets, and to make small detail cuts. Adult supervision is required for children using this and other sharp tools. Caution: one can injure oneself, and the furniture, with an art knife.
- Needle-nose pliers, for squezing parts together to glue.
- A metal ruler.
- Wooden toothpicks for specific structural members, and for applying glue.
- A bamboo skewer, or other small-diameter cylindrical stick, to help you roll some components into their shape for gluing.
- A cylinder about 2.25 inches or 6 cm in diameter, such as a wine glass, to support your model during construction.
- Glue. Use regular white glue (Elmer's Glue-All or equivalent). You might also try a thick white glue, sold in art and fabric stores, called "TACKY GLUE" (Aleen's or equivalent).
- Space. Set up a well lighted, comfortable work area, with room to set glued parts to dry.
- Time. Plan to set aside several hours for unhurried assembly. It may take four hours or more to assemble your Juno Scale Model.
- Patience. There may be some trying times. If so, remember that extra time and care will pay off with a surprisingly accurate, and handsome representation of NASA's Juno, a sophisticated spacecraft.
- Optional: Instructions regarding wires for the Plasma Waves Instrument have not been included in this version. If your use of the model would NOT POSE ANY EYE HAZARD, you can easily add the wires to your model based on a bit of research.
- Optional:
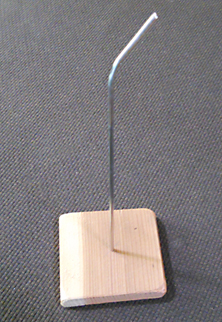 You may wish to fashion a stand for your model. A simple stand can be made by bending a length of wire. If you choose to work with wire, be cautious to prevent eye injury. The image at right shows a stand made of thick aluminum wire from a welding store inserted into a square wooden base. You may wish to fashion a stand for your model. A simple stand can be made by bending a length of wire. If you choose to work with wire, be cautious to prevent eye injury. The image at right shows a stand made of thick aluminum wire from a welding store inserted into a square wooden base.
BEFORE BEGINNING ASSEMBLY:
- Download and print the Parts Sheets. They should be printed on white card stock.
- Examine all the parts on the parts sheets, and read their names.
- Read all of these instructions. Compare model parts with the illustrations.
- Have a look at some information about the Juno Spacecraft, and get a feel for how it looks.
CLICK IMAGE TO ENLARGE
TO ASSEMBLE YOUR MODEL:
Click on each step below for illustrated step-by-step instructions. Sections marked with a * may be accomplished at the same time if two or more people are working on assembly, or if you wish to work on one section while glue dries on another.
Congratulations!
YOU'VE FINISHED YOUR JUNO SPACECRAFT MODEL.
Now that you're familiar with all of the spacecraft's major structures and its science instruments, be sure to browse the web sites listed on the main page. You'll learn more about the spacecraft, its mission, and its discoveries.
ABOUT YOUR JUNO SPACECRAFT MODEL:
Your model's scale is approximately 1:50. The model's three photovoltaic solar array "wings" can support themselves in one G, while the spacecraft's cannot.
Model design by John Jogerst, 2011.
For personal or educational use only; not for commercial use.
Adapted to 1:50 scale on this website by Dave Doody, who is
responsible for any errors or omissions made during the reformatting.
Concurrent Steps
Sections marked with a * may be accomplished at the same time if two or more people are working on assembly, or if you wish to work on one section while glue dries on another.
BACK TO MAIN PAGE
|